
SNOT, or “Studs Not on Top,” is one of the most useful techniques for adding detail and changing the direction of a LEGO build. By turning studs sideways or even upside down, you can create smoother shapes, richer textures, and details that would be difficult to achieve with conventional stud-up construction.
In this guide, I’ll share several of the SNOT techniques I use most often, from inverting parts on ships to adding texture to floors, terrain, and walls. Each starts with a small, reusable module that can be adapted to fit your own builds.
Inverting Parts
LEGO produces only so many inverted elements, such as inverted slopes and wedges, that are useful for shaping the undersides of wings. When the part I need isn’t available, I use this “SNOT inverter” to create studs on the underside of a build, allowing me to use standard parts upside down.
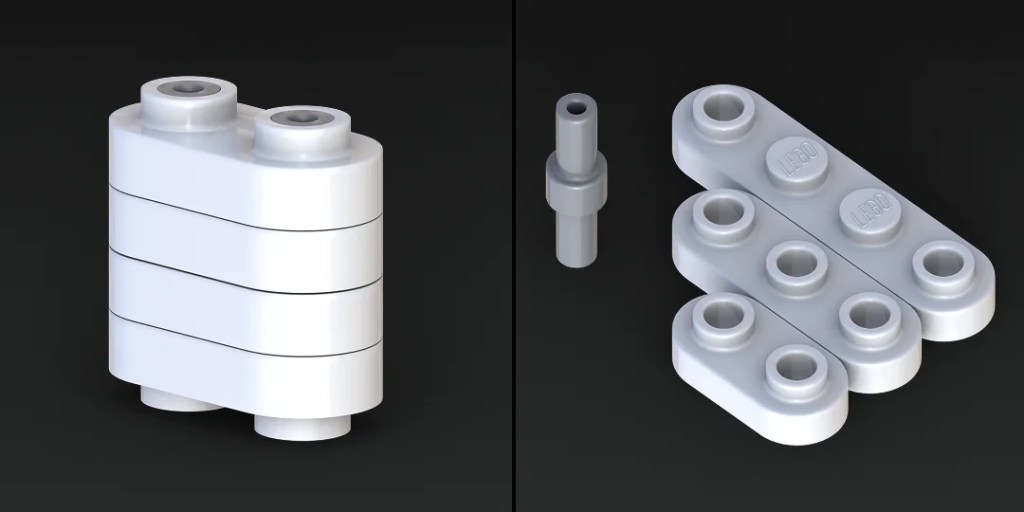
It consists of two upside-down 1×2 rounded plates with open studs (Part 35480), with two 2L bars (Part 78258) inserted into the open studs, and two more 1×2 rounded plates on top. This four-plate inverter is very strong. You can incorporate it into a larger structure by rotating the plates 90 degrees to connect them to other parts, or by replacing them with the 1×3 (Part 77850) or 1×4 (Part 77845) versions.

A SNOT inverter like this greatly expands the range of parts you can use to detail the undersides of ships and vehicles.
SNOT-Based Floors and Terrain
Incorporating SNOT techniques into a floor lets you add much more texture and variety than you can achieve with standard upward-facing plates, tiles, and slopes. Building these details as 1×1, 2×2, or other whole-stud modules makes them easy to combine without having to compensate for half-plate offsets.
For industrial interiors, I like to use upside-down Technic bricks to add texture. The 1×1 Technic brick (Part 6541) exposes the rounded underside of the element surrounding its hole. The larger 1×2 Technic brick (Part 32000) provides two of those details, along with the indentations that normally accommodate studs. Because both modules are five plates high, they can be incorporated easily into a MILS foundation.

For terrain, I like to mix in SNOT modules that turn plates and bricks on their sides, creating a different kind of texture. Place a 1×1 headlight brick (Part 4070) on top of two 1×1 plates, and you can attach various plates and tiles sideways to form details such as small pebbles in a path. Extend the module with a 1×2 masonry brick (Part 98283), and you have a convincing cobblestone pattern. Both modules can also be incorporated into a MILS foundation.

On floors such as those in a hangar, contrasting lines are useful for marking landing zones, cargo lifts, and other designated areas. You can create these as another 2×2 module, this time using a 1x2x2 inverted bracket (Part 99207), a matching plate, and a tile in a contrasting color to form the stripe.

I combine these floor and terrain techniques when creating dioramas. In “Escape of the R-41 Starchaser”, I built a raised landing pad using upside-down bricks, a dashed outline around a turbolift shaft, contrasting corner markings, and an outward-facing edge filled with greebling and industrial detail. Together, these elements distinguish the constructed platform from the landscape below.

See how I designed the terrain and SNOT-based landing pad in the complete Patreon build guide.
In my “R93 Refractor in Myrra City” diorama, I created a round exterior landing pad using the sideways-plate and masonry-brick techniques. I used the same approach to build a plate-based approximation of a circle around the pad. Its shape echoes the rounded colonnade while contrasting with the angular R93 Refractor.

See how I designed the Myrra City diorama base in the complete Patreon build guide.
SNOT-Based Walls
Using SNOT techniques in walls lets you add surface texture, expose underlying mechanical details, or suggest deterioration and years of repair. The tradeoff is thickness: these walls generally need to be two studs deep, which adds both size and cost to a build.
My basic SNOT wall module uses a 1x2x2 inverted bracket (Part 99207), topped with a layer of plates and then tiles. The bracket introduces a half-plate offset, making the completed module exactly 2×2 studs so that it fits neatly into a wall. The same idea can be adapted into 1×2, 2×4, or larger modules.

You can also extend the basic module into something more complex. This version exposes a cluster of pipes, making it perfect for adding mechanical detail to a hallway or industrial wall.

I combined these wall techniques with the earlier floor techniques in my “Pirate Hangar” diorama. They helped me create a hangar that has seen better days: one repeatedly repaired and patched together through the grit and determination of a hard-working band of pirates.

Tour the Pirate Space Station and see how I used a variety of SNOT techniques in Hangar Besh, my largest diorama, in the complete Patreon build guide.
Build in Every Direction
SNOT building is less a single technique than a way of thinking about orientation. Once you stop treating the top of a brick as the only possible building surface, even a small module can open up new approaches to shaping, texture, and detail.
The examples here are designed to be starting points. Try changing their size, rotating their connections, or swapping in different surface elements to suit your own model. Whether you’re shaping the underside of a starship, breaking up a stretch of terrain, or adding history to a weathered wall, building in another direction may be the solution you need.